Technology
Building a Content Calendar with Planning Groups: Months, Weeks and Campaign Phases, Step by Step
To build a content calendar in Doruva One, create a planning group for each month, nest a group for each week, and add posts as tasks under each week. Groups never count toward workload, so your team's load is measured by real post tasks only.
By Mehmet ÇalışırPublished 9 min read
Contents
This guide walks social media and content teams through setting up a monthly publishing plan in Doruva One, step by step, using real screens. Whether you are a team lead, a content manager or an account manager at an agency, you will end up with a structure that splits a month into weeks and weeks into posts, with everyone working from the same place. If Doruva One is new to you, start with our overview of Doruva One's modules and roles.
What is a content calendar, and why build it with planning groups?
A content calendar is a publishing plan that shows which piece of content goes out on which channel, on which date, and who is producing it. A good one shows more than dates: it also shows what stage each post is at and whose approval it is waiting on.
When teams work out how to build a content calendar, many end up leaning on two tools: the calendar lives in a spreadsheet and production lives in a task tool. Before long there are two versions of the truth, and a post marked "ready" in the spreadsheet is still waiting for design in the task tool. That gap between two sources is exactly where agency work tends to slip through the cracks.
Planning Groups in Doruva One close that gap. The month-and-week structure, which is the calendar itself, sits on the same project board as the post tasks. Anyone looking at the calendar also sees each post's status, owner and due date.
What is a planning group, and how is it different from a task?
A planning group is an organizing layer that gathers work under a period, a week or a topic. The product's own description puts it plainly: it groups sub-items under a period, week or topic and is not included in task counts or employee workload.
Doruva One's hierarchy runs Brand → Project → List → Card → Planning Group → Task → Subtask, and planning groups can be nested. In a content calendar, that means week groups inside a month group, and post tasks inside each week.
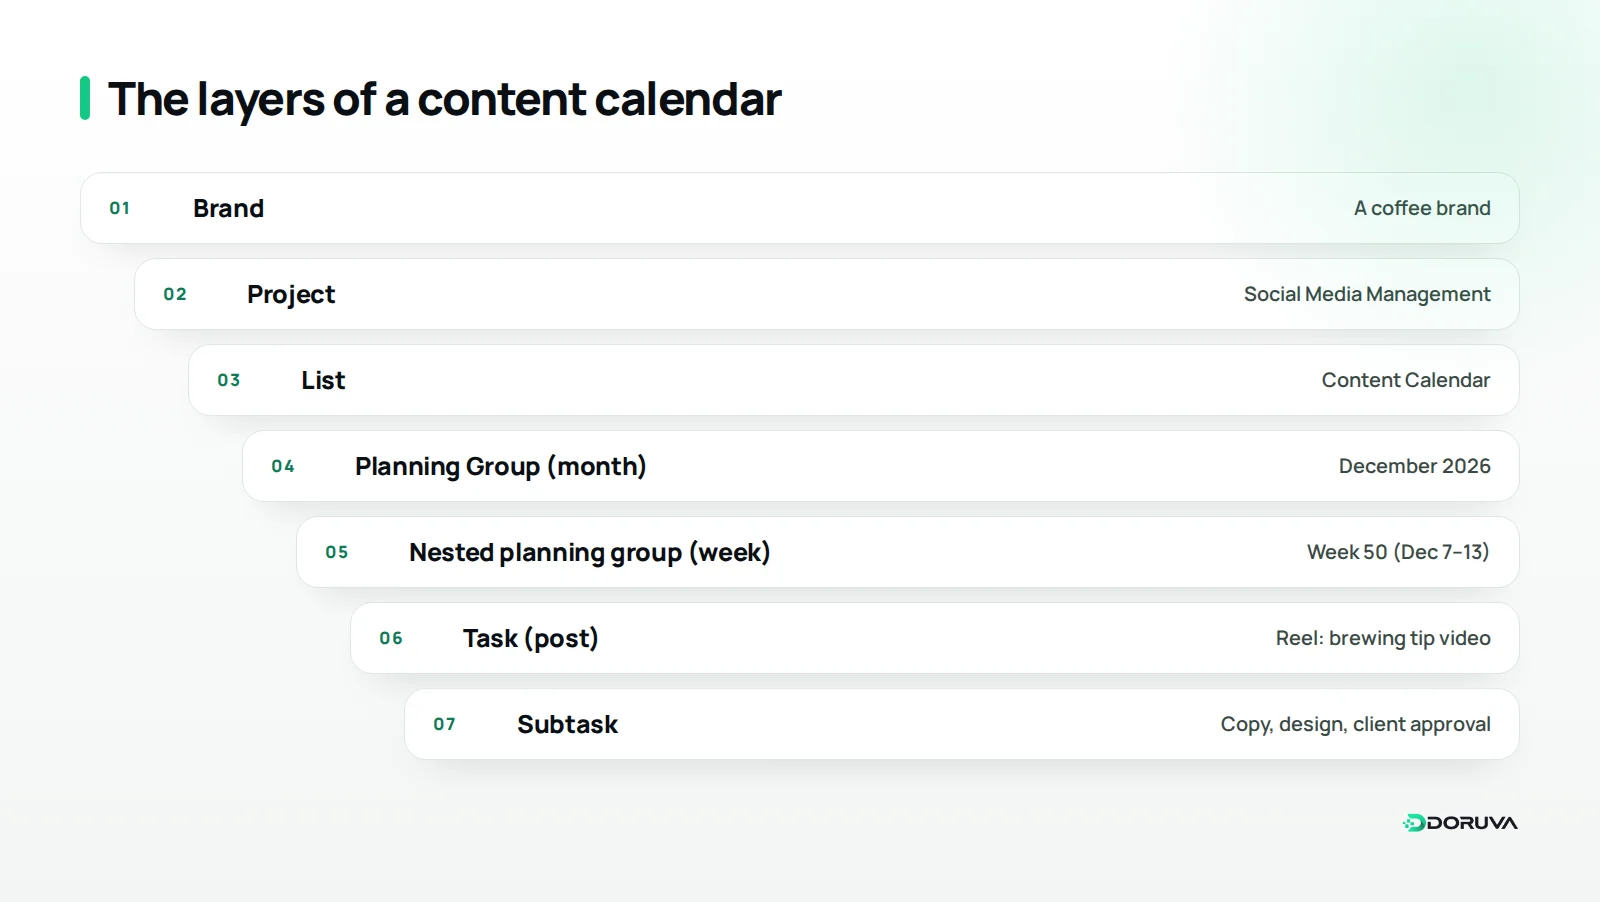
Putting the two side by side makes the difference clear:
| Feature | Planning Group | Task |
|---|---|---|
| Purpose | Groups work under a month, week, topic or phase | Defines a concrete piece of work |
| Status, priority, completion | None | Yes (Backlog to Done, Low to Urgent) |
| Task counts and workload | Not included | Included |
| Reports and calendar | Not included | Tracked by due date and status |
| Search and breadcrumb path | Shown in search and in the breadcrumb | Shown in search |
| Archiving | Archived together with everything inside it | Can be archived as a task |
Why does this matter? If you created "December 2026" as an ordinary task, it would sit open all month as work nobody can finish, show up on the team lead's dashboard and inflate the workload numbers. As a planning group, it behaves like a folder, and what gets measured is the real post tasks inside it.
How do you set up a content calendar in Doruva One, step by step?
A monthly content calendar in Doruva One takes four steps: prepare the list, open the month, add the weeks, then place the posts under each week as tasks. In the example below we build a December calendar for a coffee brand's "Social Media Management" project.
Step 1: Prepare the project and a "Content Calendar" list
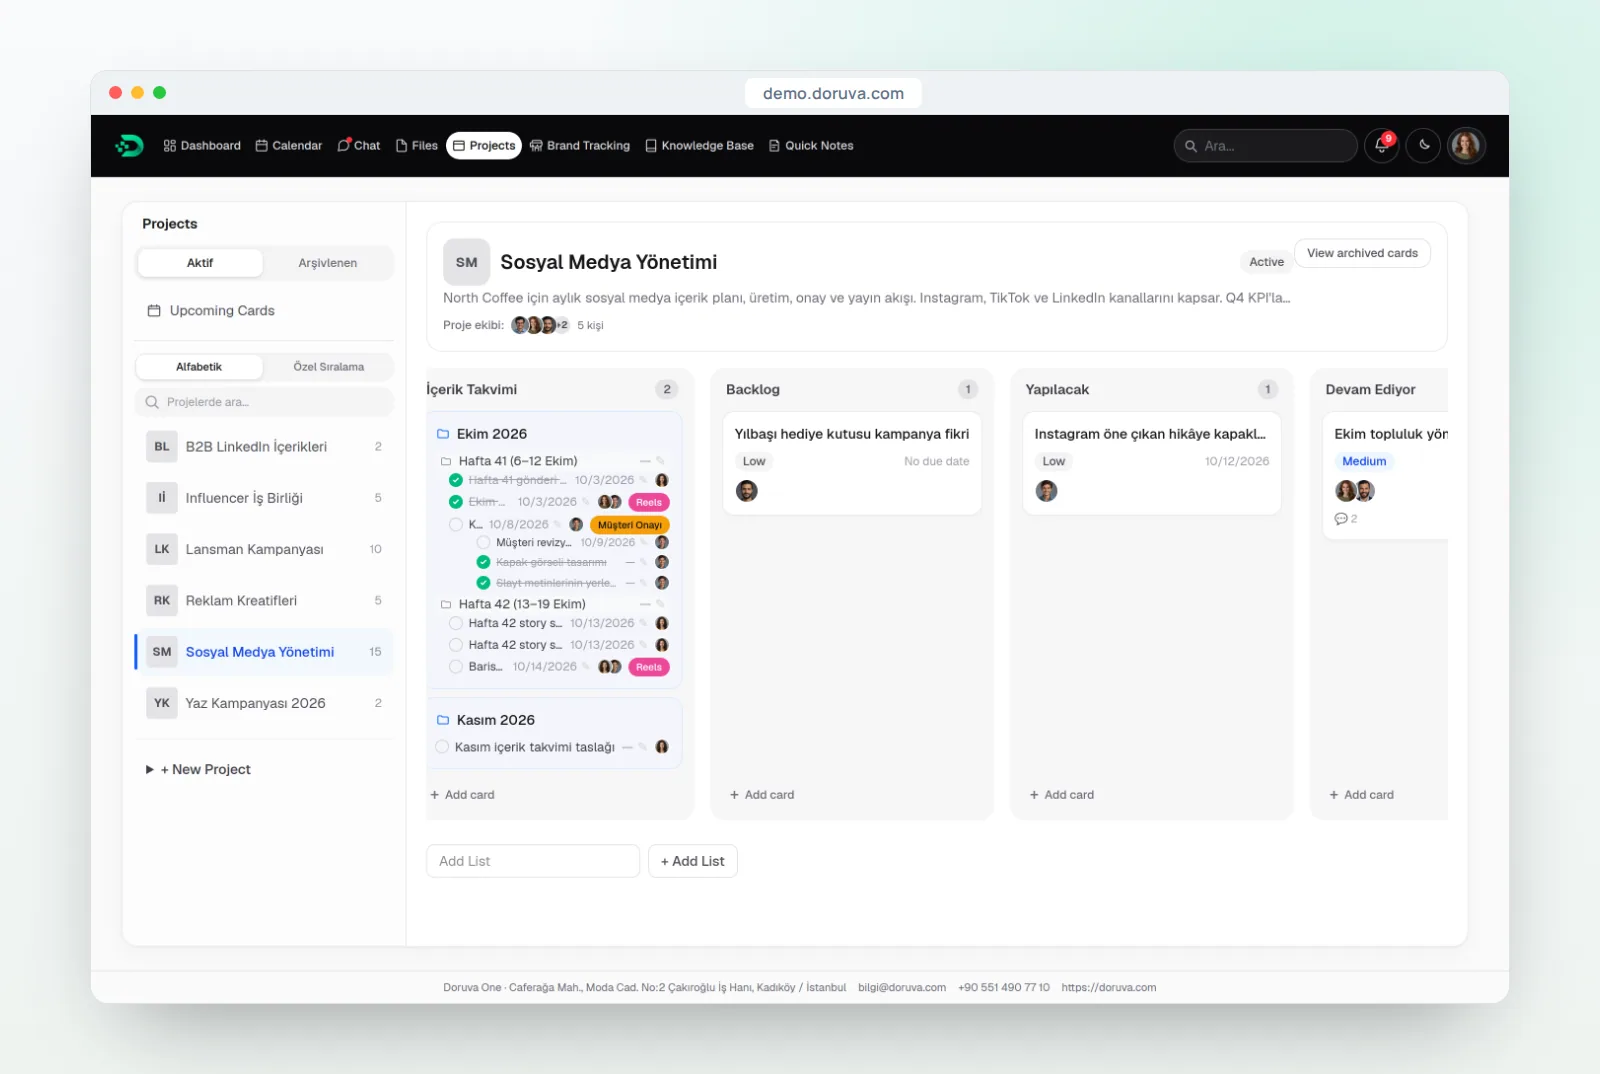
The calendar lives on the board of a project linked to the brand. Use the Add List field at the bottom of the project board to create a list called "Content Calendar". The monthly plan then sits in a single column on the board in date order, while each post's progress is tracked through its own status, responsible person and due date.
Step 2: Create a planning group for the month
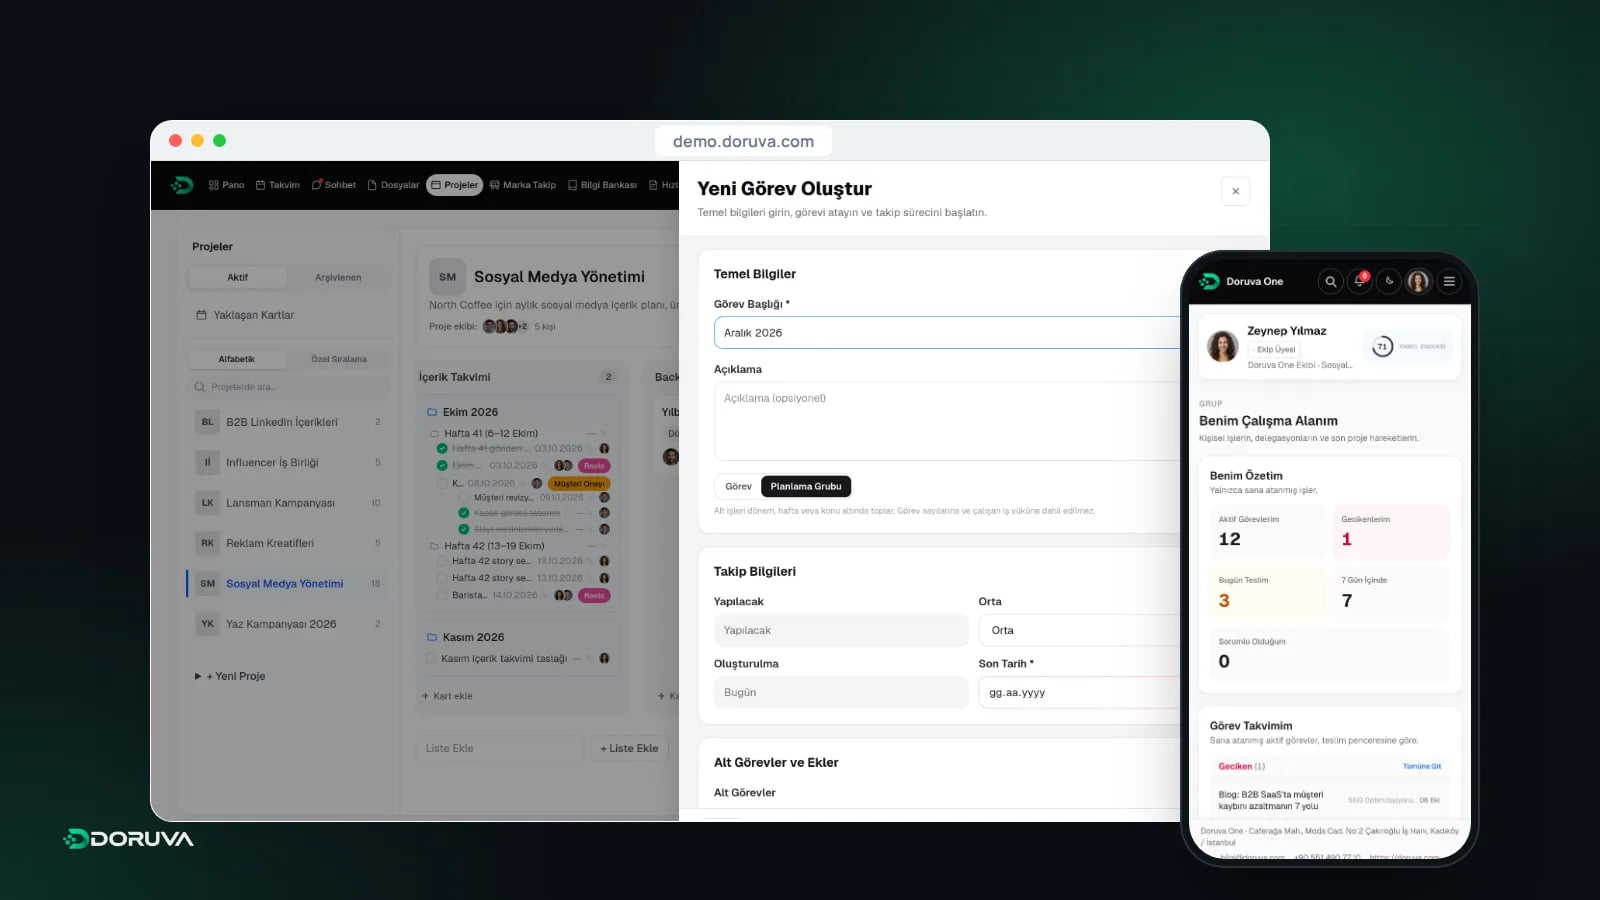
Click "Add card" under the Content Calendar list. In the Create New Task form that opens, type "December 2026" as the title and switch the selector from Task to Planning Group (labelled Görev / Planlama Grubu in the interface). A short note on the month's goal in the description helps the team, and anyone who joins later, get the context quickly.
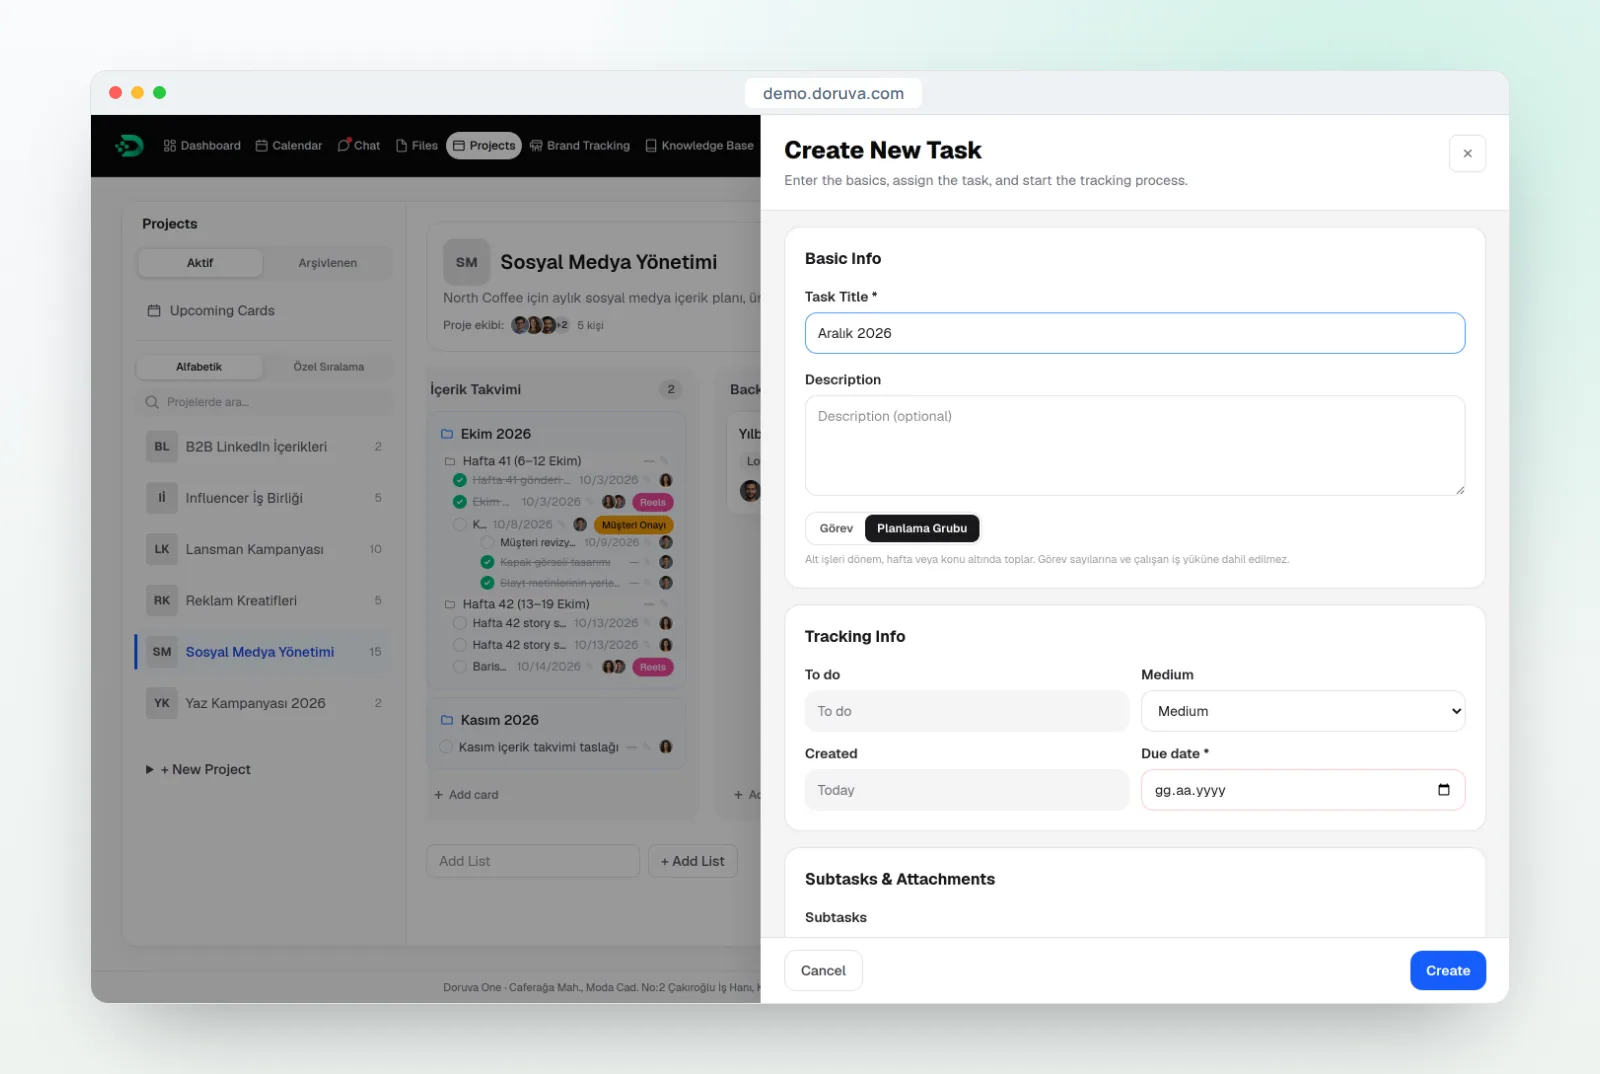
If a record already exists, there is no need to recreate it: users at management level can turn an existing record into a group with Convert to Planning Group.
Step 3: Add the weeks as nested planning groups
Open the "December 2026" record, choose Add Sub Planning Group from the Add sub-item menu, and create one group per week. Using the week number and date range together works well, for example "Week 50 (Dec 7–13)", because it makes the right week easy to find on the board and in search.
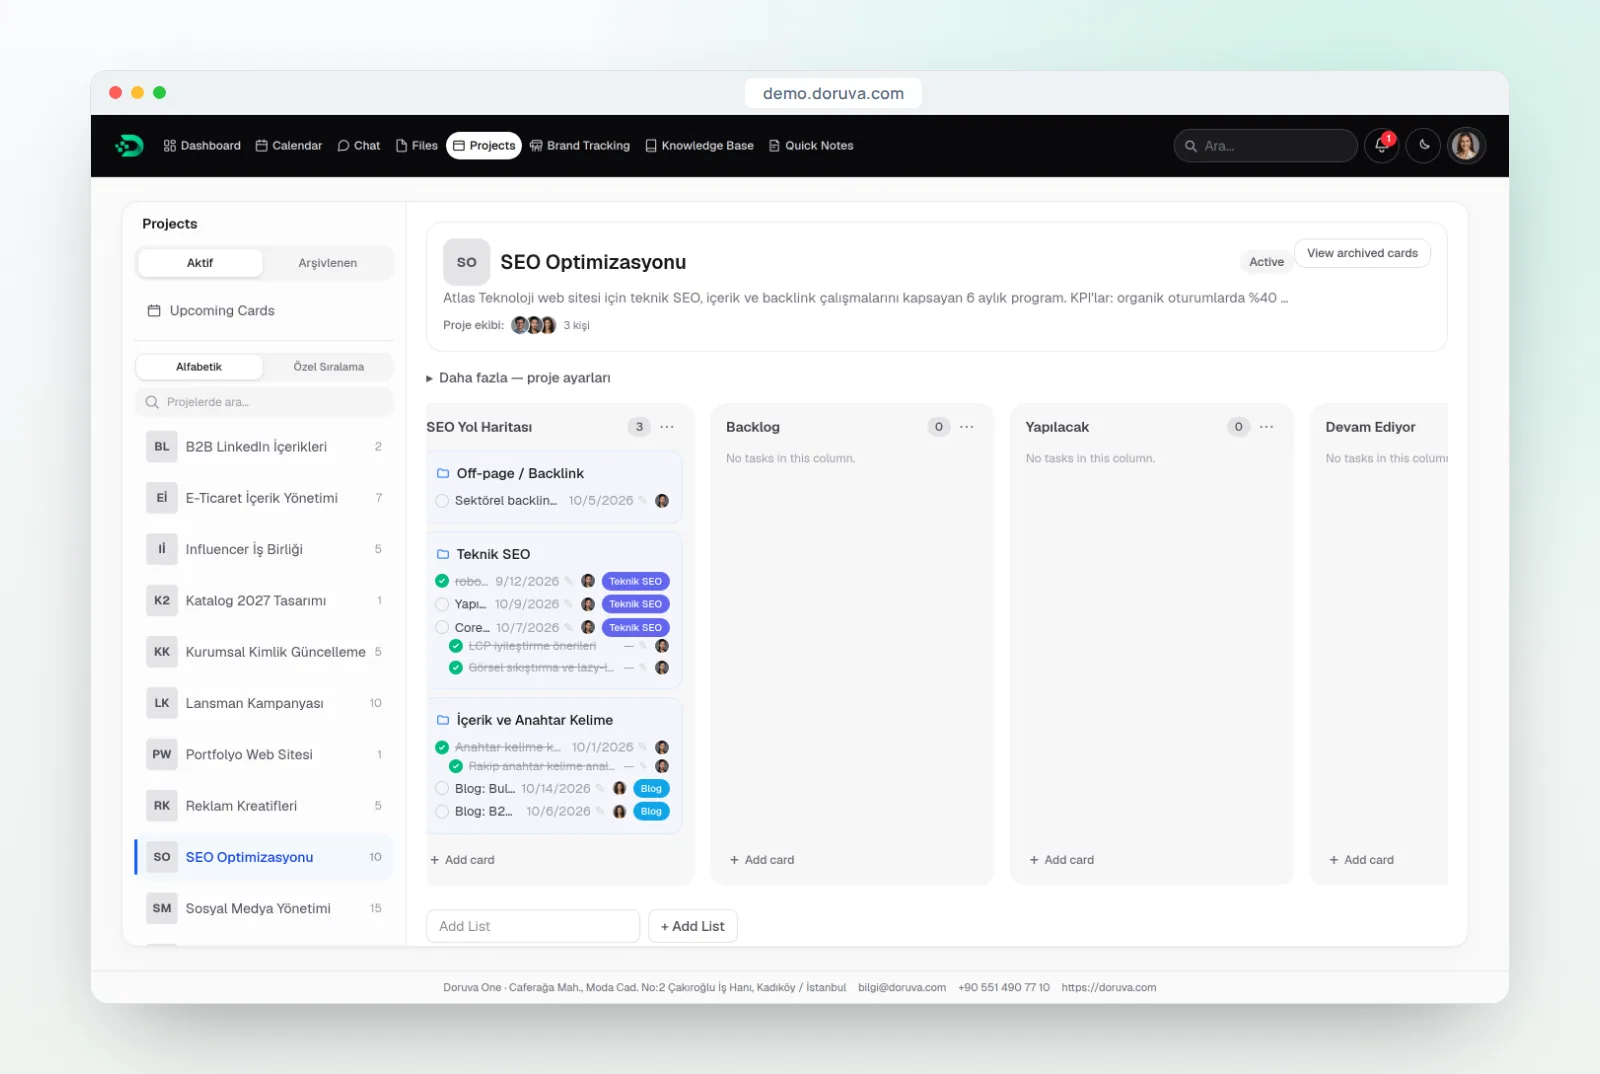
On the board, planning groups appear as folder-style cards with a nested tree. Week folders sit inside the month folder, and post tasks sit inside each week with their dates, assignees and labels.
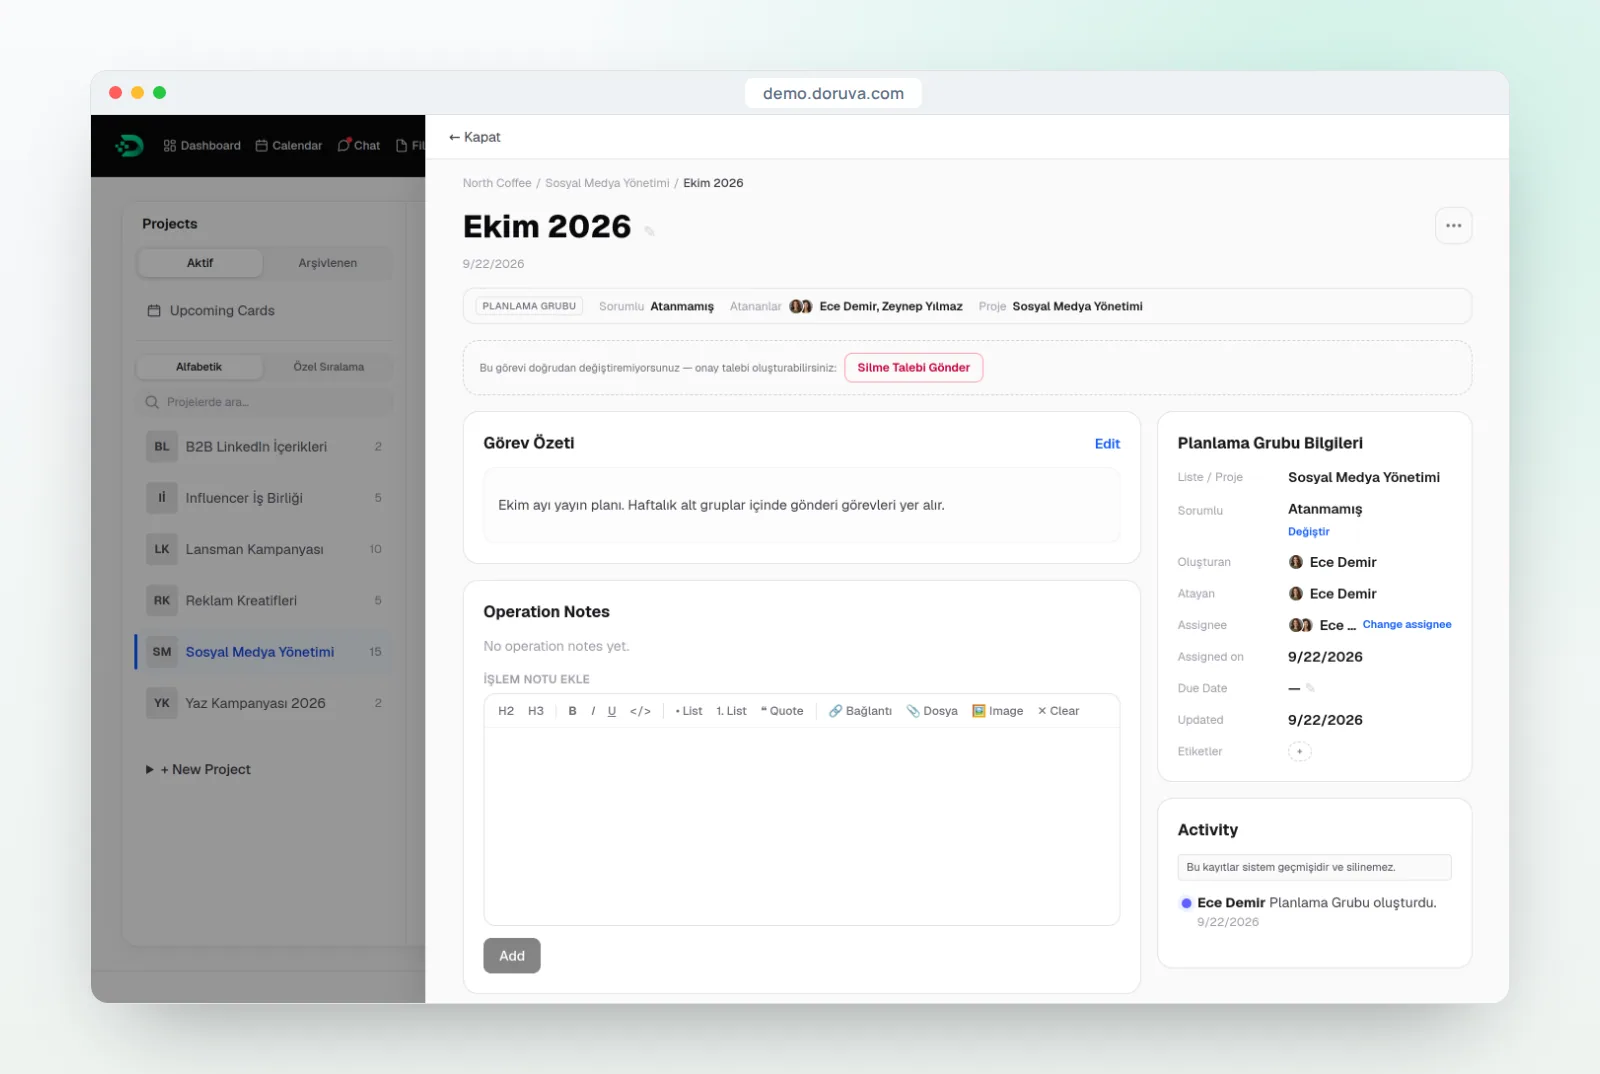
When you open a planning group, the Planning Group Details panel appears on the right and the breadcrumb path (Brand / Project / Month) at the top. A group can have a responsible person and assignees, and you can keep notes about the month in its Operation Notes.
Step 4: Add posts as tasks under each week
Each post is its own task under the relevant week. Filling in these fields is what turns the calendar into a working system:
- Title: format and topic together, such as "Reel: brewing tip video".
- Assignees and Responsible: the people doing the work and the one person accountable for the result are set separately.
- Due date and priority: work back from the publishing date and leave time for approval.
- Labels: labels like "Reels" or "Client Approval" show at a glance what is waiting where.
- Subtasks: copy, design and client approval become subtasks.
A task with open subtasks cannot be completed, which stops an unapproved post from being marked done. When the work is finished, the assignee uses Return to Responsible, the task moves to In Review, and it appears in the responsible person's Awaiting My Review view. Feedback goes into Operation Notes with @mentions, and in Chat you can type "#" to reference a task or the "Week 50" group, tying the conversation directly to the record.
How do you use the same structure for campaign phases and SEO roadmaps?
Planning groups work just as well for grouping work by phase or topic as by date; the logic stays the same and only the group names change. The three common patterns look like this:
- Time-based groups
- A monthly content calendar: "November 2026", "December 2026" and their weeks. Use this when the question is "when does it go out?"
- Phase-based groups
- Campaign phases such as "Teaser", "Launch Week" and "Post-Launch", or waves in an influencer program. Use this when the question is "which stage of the campaign are we in?"
- Topic-based groups
- An SEO roadmap split into "Technical SEO", "Content and Keywords" and "Off-page / Backlinks". Use this when the question is "how much work is there in each area?"
On an SEO project, for example, you can collect technical SEO work in a single group and turn the items from a technical SEO checklist into tasks inside it. For a blog, each topic cluster can be its own planning group, so the board shows how many articles are in progress per cluster.
How do you keep the content calendar alive week after week?
A content calendar earns its keep when it is updated every week, not on the day it is set up. This short routine keeps the board in line with reality:
- Monday: open the week's planning group and check that every post has an owner and a date.
- Daily: team members follow their own work from the Today and Overdue sections of the Dashboard, or from the Upcoming Cards view in Projects.
- Midweek: responsible people clear their Awaiting My Review queue and chase posts waiting on client approval.
- Friday: set up next week's group and tasks.
- Month end: once nothing is left open, archive the month group; archiving takes everything inside it along.
To keep the calendar fed, you can also add a topic-based "Content Pool" group where you collect evergreen content ideas and move them into weeks that have gaps.
On mobile, Doruva One already works in a phone browser and as an app added to the home screen. The Doruva One mobile app is coming very soon to the App Store and Google Play, and creating a task there will let you pick its location as Brand → Project → List → Planning group.
What are the most common content calendar mistakes?
The most common mistake is creating real work as a planning group: because groups do not count toward workload or reports, that work becomes invisible. Other typical pitfalls:
- Too many levels: month → week → day → channel trees are hard to read. For most teams, months and weeks are enough.
- Inconsistent names: mixing "Week 50", "Wk 50" and "Dec 7–13" makes search and breadcrumbs far less useful.
- Dates on the group: planning groups stay out of the calendar, so publishing dates should always live on the tasks' due dates.
- Approval outside the board: instead of tracking client sign-off in email, keep it visible with a subtask and a label.
- Late archiving: leaving finished months on the board makes the active week harder to find.
Summary and next steps
Building a content calendar with planning groups means bringing the plan and the production work onto one board, splitting each month into weeks and each week into post tasks, and measuring workload by real work only. To start today, open a "Content Calendar" list on a project board, create next month's group and its weeks, and enter the first week's posts with owners and due dates.
You can see how planning groups and the other modules work on the Doruva One product page. If you would like to design a content calendar structure for your own team together, contact us for a Doruva One demo.
Frequently Asked Questions
Do planning groups count toward workload and reports?
No. Planning groups are left out of task counts, employee workload, reports and the calendar. Only the real tasks inside them are measured.
Can planning groups be nested?
Yes. In a planning group's detail view, choose Add Sub Planning Group from the Add sub-item menu to create, for example, weekly groups inside a month.
Can I turn an existing task into a planning group?
Yes. Users at management level can convert an existing record with Convert to Planning Group, so there is no need to recreate it.
What should happen to a month's planning group when the month ends?
Once nothing is left open, archive the month group. Archiving includes everything inside it, which keeps the board focused on the active weeks.
How do I reference a planning group in chat?
Type "#" in chat or in text fields to reference a planning group, such as "Week 50". The conversation is then linked directly to that week.